Description
adaptateur ATX 24 pins vers borniers , également compatible avec les alimentations de PC ATX 20 pins .
Il suffit de brancher n’importe quelle alimentation de PC pour bénéficier du 5V / 12V /3.3V et même du -5V et du -12V avec les alimentations PC les plus anciennes qui fournissaient ce type de tension. Les tensions sont bien réparties grâce à un Circuit double faces et se récupèrent sur un ensemble de borniers 16A.
Produit fabriqué par Retroelectronik et Made in France qui était gage de qualité , vendu à petit prix
Produit reconditionné , d’occasion , des traces de rouille , switch On/Off changé , testé ok au multimètre ( voir les photos ebay )
Description originale du site trouvé sur Wayback machine ( la version Fr n’est hélas plus disponible ) :

Power adapter ATX PC to terminal blocks 12V 5V -5V and 3.3V for LEDs, power supply of arcade terminals and/or all that could require a large and varied power supply
PART 1: Product Description
Whether you need 12V to power LEDs, 12V / 5V and -5V to power an arcade or 3.3V to test an electronic fixture, a PC power supply can offer you all that.
Everyone has an old PC that no longer serves; and even if it’s not the case, ATX power supplies has the best Value for money as their cost and quality have nothing to do with what you can buy in the power supply market. It’s possible to find a 300 or 500 watts used ATX power supply for less than 10 euros. This is perfect especially if you need a lot of power at a reasonable cost.
This ATX to terminal adapter turns any ATX PC power supply into a versatile power supply you can easily connect to using its multiple screw terminal blocks.
Features :
– Presence of an ON / OFF button
– 6 X +5V connectors on terminal block 16A
– 10 X GND connectors on terminal block
– 1 X -5V connector on terminal block (Caution, the -5V is not present on all ATX power supplies, if your power supply does not provide it, this output will not deliver any voltage)
– 1 X -12V connector on terminal block
– 4 X +12V connectors on terminal block
– 3 X 3.3V connectors on terminal block
– 2 « Power Con » connectors to easily connect a remote ON / OFF button if this adapter is not intended to be accessible (in this case put the integrated button on « OFF », and connect your new (any self lock) button using two wires to the two Power Con terminals ).
he maximum usable power depends solely on your power supply (up to several hundred watts admissible and up to 16A/terminal)
– 1 X 24 pin ATX connector also compatible with 20 pin connectors for absolute compatibility with all ATX power supplies and optimal distribution of the electrical load.
PART 2: Examples and tutorials for use:
Example of connection with an old 350 watt power supply purchased for less than 10 euros on ebay:
The power supply has a 20-pin connector, 4 pins remain unused. Thanks to the keying system of the ATX standard, you can only put the 20 pins connector at it right place, otherwise it just doesn’t enter.
The available current is written directly on the power supply, ie in this example the values given on the label:
WARNING, this is only an example, adapt this calculation according to the data listed on your own power supply.
So remember this very simple formula derived from the law of ohm: P (power in Watts) = U (in Volts) X I (in Amperes)
I now have:
+ 3.3V X 15A = 49.5 Watts at 3.3V
+ 5V X 25A = 125 Watts at 5V
-5V X 0.6A = 3 Watts at -5V
+ 12V X 13A = 156 Watts at 12V
-12V X 0.6A = 7.2 Watts at -12V
And I have all these powers simultaneously, be careful not to exceed the power calculated, otherwise you could destroy your power supply (actually not really as ATX power supplies as far as I know all have an integrated surge protection but it could happen).
PART 3: Security Information:
Attention, this adapter must not be in direct contact with a conductor (water, metal, etc …), to avoid any risk of short-circuit. It can be placed on an insulating surface or fixed using its 4 holes M3 (diameter 3mm) located at each of its ends. The M3 format is certainly the most standard and allows to use PCB feet, spacers, screws, etc …
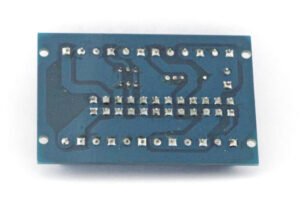
rear part of the adapter:
I also propose on ebay a version sandwiched between two insulating plexiglass plates and mounted on fixing feet.
There it is :


Avis
Il n’y a pas encore d’avis.